Elegant Jewelry Beads and Accessories

Tuesday, 28 June 2016

Nice Tutorial on How to Make Heart Wire Wrapped Necklace

Hello, friends. Do you need any wire wrapped jewelry? How do you think of wire wrapped necklace? If you are looking for any wire and beads necklace tutorial, then look here, you can have a nice try to make a heart wire wrapped necklace after seeing this project. Hope it is helpful for you.
Supplies needed for heart wire wrapped necklace:
Brass Twist Chains
1.5MM AluminumWire
0.3MM Copper Wire
Brass Lobster Claw Clasp
Handmade Glass Beads
Step 1: make the basic wire wrapped pattern
Firstly, cut off a piece of aluminum wire and make coiling circles at one end.
Secondly, twist the wire into weave shape, then make two circles at another end.
Step 2: finish the heart wire wrapped pendant
Firstly, cut off a piece of aluminum wire about 5cm, and twist the wire into a “v” shape.
Secondly, add the “v” shape into the first weave, then connect them with cooper wire, and left 1cm wire unwrapped.
Thirdly, twist the left unwrapped wire into a circle to make the wire heart pattern.
Fourthly, add another four “v” shapes to make another same four heart patterns. Then cut off the extra wire.
Fifthly, cut off a piece of cooper wire about 8cm, then slide a 6mm glass bead onto the wire. And add the bead onto the middle heart pattern of the pendant, then fix them with wrapping the cooper wires.
Step 3: finish this heart wire wrapped necklace
Firstly, cut off two pieces of brass twist chain, then add a jump ring and a lobster claw clasp.
Secondly, connect two ends of the chains.
Here is the final look of the heart wire wrapped pendant necklace!
Cool wire jewelry design, do you like it? You can have a nice try to make one for yourself. And please just share us your works if you have greater wire necklace making ideas. Look at below picture about Pandahall promotion, use JL50FFBLOGEN628 to get 5% off your orders. See you!

Tuesday, 21 June 2016

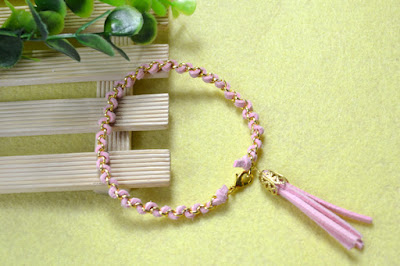
DIY Simple and Pretty Suede Cord Bracelet for Beginners

Hi, friends. Have you ever made jewelry before? Do you want to try to make any crafts for yourself? If yes, then I think you can see this post. Today I am going to show you a tutorial on how to make a simple and pretty bracelet for beginner. It is a definitely great idea for you to have a nice try. Then just prepare the supplies and start your works soon.
Supplies needed for suede cord bracelet making:
3MM Suede Cord
Brass Chain
Bead Cap
0.3MM Copper Wire
Jump rings
Lobster Clasp
Step 1: make the basic pattern of the bracelet
Firstly, cut off a piece of chain with suitable length and a piece of cord which is a little longer than the chain.
Secondly, make a simple knot at the end of the cord, then open the first ring of the chain and pass the knot to the ring then close it.
Thirdly, pass the cord to the second link, and tighten them. Then pass the cord to another link from opposite direction.
Fourthly, then continue to slide the cord to other links of the chain until you get desired length, just as the picture shows.
Fifthly, cut off the extra cord and tie a simple knot at the end of the cord.
Sixthly, trim off the excess cord.
Step 2: make the tassel for this cord bracelet
Firstly, cut off five pieces of cords and gather them.
Secondly, cut off a piece of cooper wire and wrap the cords with cooper wire, then twist the wires.
Thirdly, add a bead cap onto the wires. Then cut off extra wires and make a loop.
Step 3: finish this tassel cord bracelet
Add a jump ring and a lobster claw clasp to the pattern and connect this bracelet. 
Then this chain and tassel cord bracelet has been finished!
Great! Have you done it? It is very fantastic of you to make such a beautiful bracelet. Please just leave a comment if you have any question about this bracelet making. Share it if you love it. See you next time!
Check Pandahall.com to get the 5% off your order with the code JunBLOGEN5OFF. Have a nice shopping!

Tuesday, 14 June 2016

Amazing Black Wire Wrapped Cat Making for Kids

Hello, guys. Do you like animal? How about cat? Then do you want to know how to make a wire wrapped cat with jewelry wire? Then please see this post and check how to make a wire cat craft for kids. You can try to make one for your children if they always love it. The details are listed as below.
Supplies for wire wrapped cat craft making:
0.8mm Black Copper JewelryWire
Needle Nose Plier
Round Nose Plier
Diagonal Plier
Tweezers

Step 1: make the basic part of the wire cat
Firstly, cut off a long piece of the copper jewelry wire and make some circles with the wire and you can do it with the help of certain thing.
Secondly, cut off another piece of jewelry wire and fix one side of the circles with the wire.
Thirdly, adjust the wire circles and make it can stand on the table.
Fourthly, cut off a piece of jewelry wire and make a circle, then put the circle onto the cat body pattern. Then fix them together. 
Step 2: finish this wire cat
Firstly, cut off a piece of wire and twist it into an M shape, then cut off two pieces of wires and make them into column shapes.
Secondly, cut off three equal pieces of jewelry wires and twist them into that shape just like beard, and you can do it as below.
Thirdly, add the M shape pattern on the circle. Glue them together.

Fifthly, add the two column shapes onto the M shape to be as the eyes.
Sixthly, add the three pieces of wires to be its beard.
Then this black wire wrapped cat has been finished!
Lovely wire wrapped cat, right? Do you have any interest about it? Simple just as you see, you can make one for your kid and it is a great choice to put it in your house. So are you planning to start making it? 

Monday, 6 June 2016

DIY Heart Pattern Bracelet with Acrylic Beads and Glass Beads

Hello, guys. Happy to see you here. Today I am going to show you a tutorial on how to make a heart bracelet with different kinds of beads, do you have any interest? Then please follow me to see the details below. Hope you will like it.

Supplies needed for heart pattern bracelet making:
23mm Handmade Blue Lampwork Beads
10mm Blue Glass Beads
4mm Abacus Acrylic Beads
1.5mm Silver Aluminum Wire
Iron Jump Rings
Iron Twisted Chains
Iron Eye Pins
0.3mm Copper Wire
Round Nose Plier
Side Cutting Plier
Long Nose Plier
Scissors
Step 1: make the wire wrapped heart pattern
Firstly, cut off a piece of 1.5mm aluminum wire about 8cm, then make a loop at two ends.
Secondly, twist the wire into a heart shape, then twist the bottom into a small angel with jewelry plier.
Thirdly, make another same heart pattern with the same steps.  
Step 2: add the beads onto the heart pattern
Firstly, cut off a piece of 0.3mm cooper wire and slide a 4mm acrylic bead onto it, then wrap the wire around the heart shape.
Secondly, continue to slide the acrylic beads onto the cooper wire one by one and wrap the wire around the heart shape until half of the pattern is covered.
Thirdly, add the beads on another heart pattern.
Fourthly, slide a lampwork bead onto a headpin, then make a simple loop. Then connect two heart patterns with this beaded dangle.
Step 3: finish this heart bracelet making
Firstly, slide two blue glass beads onto two headpins respectively, then make a simple at the end.
Secondly, add the two glass beaded dangles to two heart pattern, like this picture shows.
Thirdly, cut off 2 pieces of chains and connect them on the two sides, then connect them with a lobster claw and a jump ring.  
Then this heart bracelet has been finished!
Do you like this heart beaded bracelet? Please let me know if you have any question about this bracelet making. Then have a nice try! See you next time~