Elegant Jewelry Beads and Accessories

Showing posts with label beads for jewelry making. Show all posts

Monday, 27 July 2015

Places To Look For Jewelry Making Supplies

People make jewelry as a hobby or as a small business to earn some pocket money. The jewelry type you make is your choice, but you need jewelry making supplies. There are different places where you will find such supplies for jewelry making. Thus, you need not stick around one place or one shop.      Choosing supplies for jewelry can be done from different places so that you get a good variety to make stunning jewelry pieces.

http://www.pandahall.com/

Large places


·         Trade Expos: These are fascinating places to look for jewelry making supplies and you can find new making supplies. The trade fairs are the places where manufacturers unveil their new pieces, before they launch it in the market for wider release. This gives them an opportunity to test their products and you can stay ahead by buying these supplies. However, be aware, take some formal identification as some trade expos considered only business people who are registered.

·       Wholesale suppliers: Jewelry making supplies can be looked for with wholesale suppliers. They will have large quantities of beads and supplies. They often have a large range and you can get amazing deals on buying in bulk. They exist in physical locations, but are also found online.

http://www.pandahall.com/

Smaller places


·         Hardware Stores:  Picking up jewelry making supplies from your local hardware stores is possible as they are physical tools such as adhesives, wire cutters and pliers. Finding jewelry making supplies from here may be less expensive, while the specialist shops are expensive as they add a premium on such tools.
·         Local Bead Sellers: This is also an ideal place to look for beads and making supplies if you require beads in small numbers. You can select your choice by hand and also see the items physically and feel them before using.
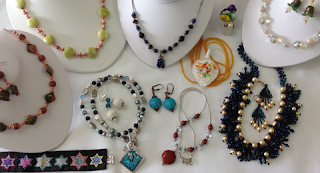
Many jewelry makers use items from day-to-day life in jewelry making. Using natural items such as sea shells is also admirable. As a designer, it is worth looking around and shaping your creativity. You may create bracelets, necklaces, earrings and anklets for yourself or make it a small time income by selling them. The supplies include pliers, needle files, wire guards, beading mat, bead reamer, nipper tool, chain nose pliers and tweezers.  Remember that designing jewelry is not very simple; you have to learn the courses and make appropriate use of the different making supplies.  Regardless of the jewelry design, you need jewelry making supplies, whether you are an advanced jewelry maker or a beginner.

Wednesday, 3 September 2014

Mix Chain Bracelet DIY


This is an adorable vintage, but a little hippie style bracelet. It connects the turquoise beads, Tibetan style bead spacer and lampwork beads by 0.8mm wire. After arranging the beads, cute bronze colored charms, like starfish, shoes, tortoise, shells are added. And then make the single twist chain connected with the Tibetan bead spacer randomly. At last, don’t forget the lobster claw claps and extra double chain as the bracelet tassel. If you run an Etsy shop, this easy but fancy bracelet can be a great choice. And if you want to add more unique charm/pendants to your designs, go online for some wholesale charms, as jewelry making suppliers online always have much more versatile products available.


Monday, 18 August 2014

DIY Beaded Hair Band

Hair bands are must have for girls to dress themselves up. And I’m sick for making hair bands with cute colorful beads to create unique style. Here, I came across this DIY beaded headband adorned by rhinestone beads, pearl beads, and plastic beads of flower shapes. Let’s have fun to DIY it with right beads supplies.


You'll need: 
Hair band findings
15-20 flower plastic beads
8-10 pearl beads
40-50 rhinestone beads
a disposable container or popsicle stick
a handful of toothpicks
E6000 glue


Squeeze a small amount of E6000 into popsicle stick, use the tip of toothpick apply a dollop of glue onto the back of flower beads. 

Press the flower bead in the center of headband and hold in place for 1min.

Continue the rest beads…

Create a pattern, alternating flowers and pearls.

Crowned!

Tutorial source: http://honestlywtf.com/diy/diy-dolce-gabbana-tiara/

Tuesday, 12 August 2014

Gemstone Beaded Bracelets!


Gemstone beads are perfect beads with natural color and luster for adding beautiful flash on your jewelry design. Many jewelry maker, admires have been attracted by gemstone beads for thousands of years. See these four bracelets; all are used with the gemstone beads. The colorful beads are looped up with headpins and then hung on the chains, like grapes, and then they were added with toggle clasps for closure. So pretty nice beads for jewelry making can make your designs a huge different. Jewelry with gemstone beads can make a great gift for your loved ones.

Friday, 8 August 2014

8 Jewelry Pieces of My Favorite

1, Hair band with flowery acrylic beads- need this when doing a vintage hairstyle.


2, Bookmark by old charms & transparent beads- can add sparkle and old elegance to my favorite books.


3, Silver chain & wheel charm & glass beads- would be nice for matching with a leather jacket.


4, Necklace with wire&pearl beads- unique one!


5, Ear cuff out of turquoise beads, can never be out of the trend!


6, Inexpensive sequin plastic beads- a pair of simple but chic earrings!

7, A mixed piece of lace, antique links, green beads and ribbons. Just love it!

8, Charms, all the charms!


Thursday, 24 July 2014

How to Use Perler Beads


Apart from the craze for loom bands, Perler beads are on a rage, too. These colorful and affordable little beads can be easily made into any patterns or shapes of cute crafts. After arranging them into certain shape as your desire, they can stick together with a little heat, thus getting your own handcrafted magic finished!

Simple steps to use Perler beads:

1, Select the pegboard. First, you must know what kind of shape you want. Perler beads are available for various shapes of pegboards. Like hello kitty, dogs, butterflies and so on. So pegboard matters a lot.
2, Choose the colors. Choose the colors that match as closely as your design.
3, Place perler beads in the appropriate spots. Put Perler beads into the little spikes protruding from the board, and go on with the pattern you chose.
4, Heat. Get some ironing paper, and place it over the fuse beads on the pegboard. Preheat a dry iron to a medium setting, and slowly move the iron in a circular motion over the beads and pegboard for about 10 seconds; check if the beads have fused together. (If you don’t see the beads expanding, iron again for 5 seconds.); remove the iron paper, and set the pattern aside to let it cool.